Quadgrow trial – part 1

Let’s talk tomatoes.  At the beginning of this year’s growing season I was lucky enough to be sent a Quadgrow planter, after spotting them at this year’s Garden Press Event in London (back when we are able to travel freely around the country – remember those days?!). 

The Quadgrow display at the Garden Press Event, March 2020

I was really impressed with the set up on display – they had a selection of chilis growing in these, as it was March and still early in the season, but they’re also suitable for tomatoes, peppers, cucumbers and other tall cropping plants.  The really big deep pots are placed into a large tray which you fill with water, making it a self-watering system which keeps your plants from drying out for up to 2 weeks.  This makes it incredibly useful during the summer when a) the weather is hopefully nice and warm, making your greenhouse very cosy and b) you might (under non-Covid circumstances) be planning to go on holiday.  With the Quadgrow you simply fill up the tray and can leave your plants for a few days, knowing they won’t be crispy when you come home again! 

After speaking to the guys from Greenhouse Sensation at the GPE they got in touch and asked if I’d like to trial the planter and I jumped at the chance.  Growing tomatoes is one of my favourite things to do in the garden – I love the whole process, from sowing the seed right through to harvesting those ripe red fruits, and as I’m always interested to try new varieties and techniques I thought this would be an excellent system to use this year, in pursuit of the perfect tomato! 

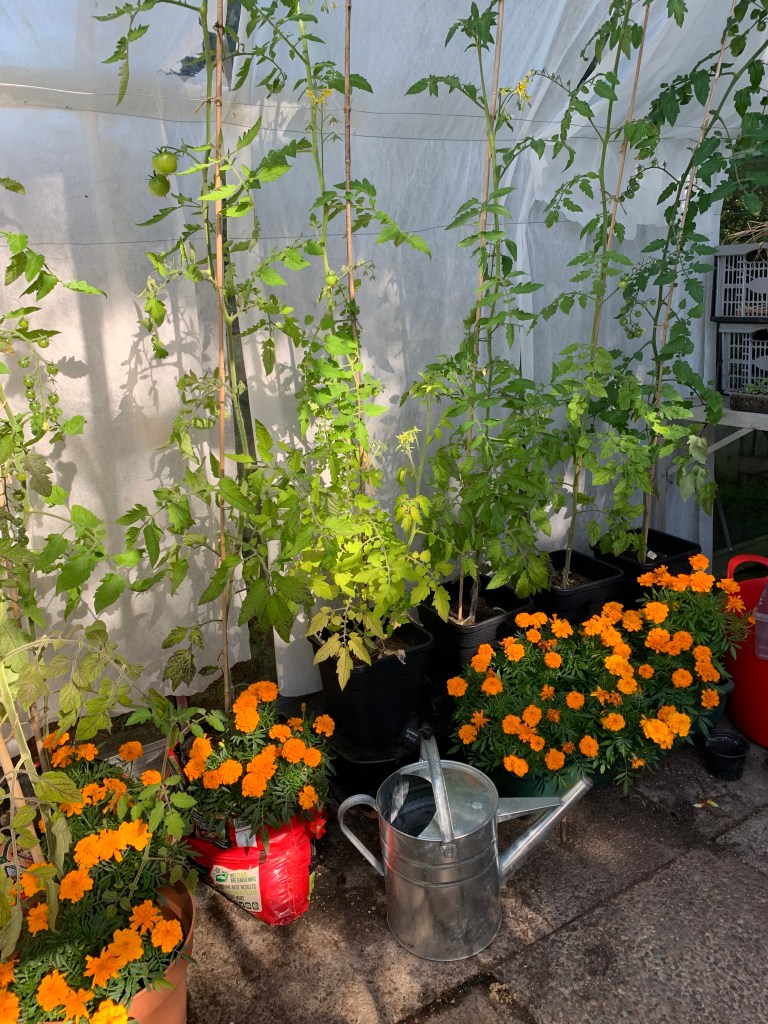
The package came safely in the post, complete with two trays, four pots and some plant food and I set up the system in mid-May when my tomato plants were getting big enough to plant out and live in the greenhouse.  Bearing in mind that I’m not particulary handy or technically-minded it was easy to set up and I had the thing slotted together in minutes.  You simply have to connect the trays with a little pipe and also insert the filters and make sure the wicking material is in place within each pot.  This is how the system keeps the soil moist so it’s important to make sure the wicking material is in contact with the water.  I actually left a little corner of it visible above the soil so that I can check it’s still damp – that way I know the soil is still getting the moisture it needs.  Once the pots were filled up with some peat-free tomato compost I popped in each plant, inserted a bamboo support and tied them into place as I usually do.  

In the interests of not-very-scientific experimentation I’m also growing the same varieties of tomato in the same peat free compost but in growbags and pots.  I’m looking forward to seeing how each method compares, and whether I have healthier plants, or better fruit, from those grown in bags, pots or the Quadgrow.  There will have to be a lot of tasting to find out… 😋

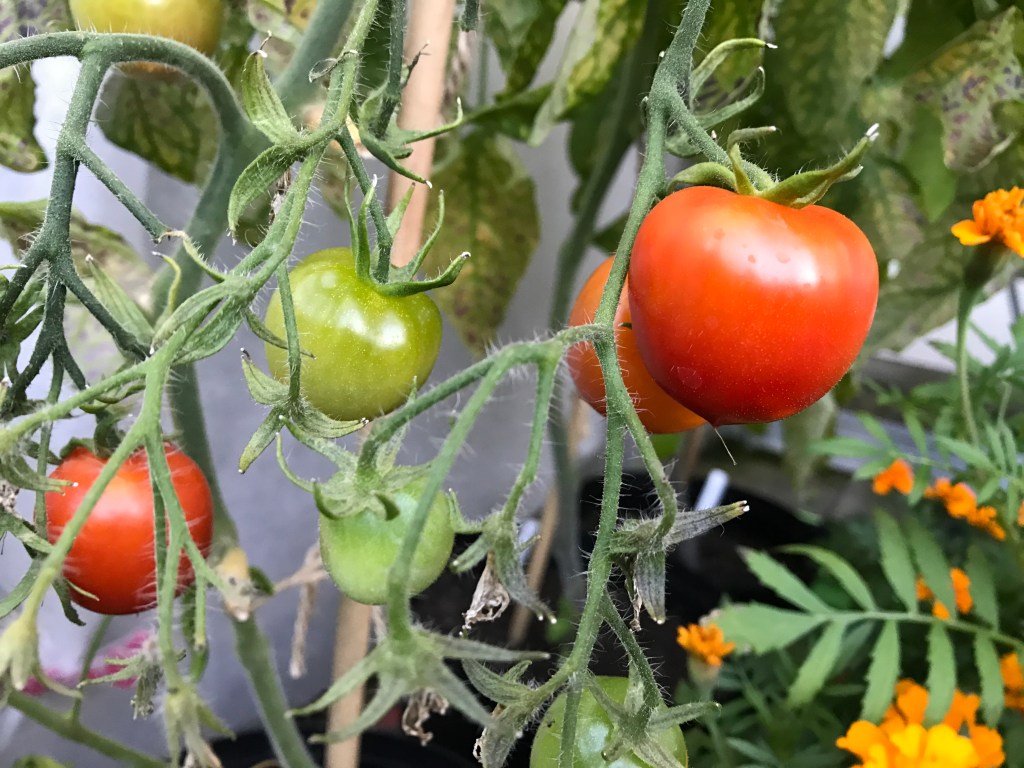
And if you’re wondering what varitieties I’m growing, I’ve got: Gardener’s Delight, Sungold, Rosella and Black Russian.  I’m also growing one plant called Maskotka outdoors – another experiment to see if it’s possible to get a decent crop of tomatoes outdoors in Scotland.  I have my doubts, but actually this plant seems to be doing fine – although a bit more compact than the others it’s setting fruit and looking fairly healthy! 

So far, I’ve topped up the Quadgrow with water about three times and it hasn’t yet been empty when I’ve checked.  The plants are definitely more thirsty the bigger they’ve got so I’m keeping a close eye on the water level each time I’m doing a #Fridayfeed.  

You can check out photos and videos of the Quadgrow on my Instagram feed @mycornerofearth – there’s a series saved to my Stories including the set-up video and I’m including regular updates as the plants develop.  I’ll report back more progress here on this blog as my plants grow and hopefully give me some tasty tomatoes!

My tomato plants are flourishing so far in their Quadgrow planter!

Get Into Grow Your Own

“Nothing tastes as good as home-grown!” – a familiar cry from allotment owners and keen gardeners everywhere. But is it true? And are you ready to find out for yourself?

Why?
There are many reasons why growing your own is a good thing to do – both for yourself, and for the environment. When you grow your own food, you know exactly where it’s come from: your own soil, pesticide-free and freshly picked. Often, the produce we buy from the supermarket shelves is already several days or even weeks old and may have been treated with preservatives to prevent them from spoiling. Carrots, for example, are typically stored for anything from 1 to 9 months before being sold in the shops; in contrast, you can pick a carrot from your garden and have it cooked and on your plate within minutes – guaranteed freshness which also means fantastic flavour.

And the total food miles? Zero! At a time when the climate emergency is on everyone’s lips, reducing the amount of carbon emitted by food transportation is another way we can contribute to the fight against global warming. Not to mention that growing your own food completely bypasses the plastic packaging involved in unnecessarily wrapping fresh produce. But perhaps one of the best reasons to get into ‘grow your own’ is because it’s really enjoyable! It’s incredibly satisfying to sow some seed, watch the shoots germinate and grow and eventually harvest some delicious food to feed yourself and others.

Courgette seedlings

Where?
You don’t need a huge garden or allotment plot to begin growing fruit and vegetables – any outdoor space can be adapted for growing. Garden beds are useful, but if space is limited you can grow in pots, window boxes or growbags. If you are fortunate enough to have some room in the garden, or even an entire allotment plot, you can sow straight into the ground or create raised beds, which can be constructed from various materials, and can offer easier access to the soil and plants. In terms of tools, a basic but useful set would include: a spade and/or fork, a rake, a trowel and a watering can or hose.

Your growing area should be prepared during autumn to late winter, so that the ground is ready for planting in spring when the soil warms up. This is the time of year to begin sowing – a wide range of vegetables can be started from seed either indoors on a sunny windowsill or under glass in a greenhouse or cold frame; these will be planted out into your veg beds once they’ve established a good root system and after the last frosts (generally around mid-late May for Scotland).

What?
You’ve got the space and the tools – now what to grow? The best place to start is to think about what you like to eat, and grow that. Love potatoes? They’re quick and easy, and even better fresh from the plot. Can’t stand carrots? Then don’t bother – they have a relatively long growing season, so put your efforts into something you prefer. Figure out how much space you’ve got, and choose the crop to suit. Peas and beans grow vertically, so don’t take up much room; potatoes, on the other hand, are large and leafy and need to be spaced around a foot apart. Smaller, fast-growing salad veg such as lettuce, radish, beetroot and spring onion can often be planted among those which take longer to harvest, maximising your growing space.
Tomatoes require some extra effort, but are well worth it – there is nothing to compare with the flavour of a fresh, homegrown tomato. These usually need to be grown in a greenhouse, with careful watering – but there are some outdoor varieties which may withstand the variable weather of a Scottish summer. Other greenhouse (or warm conservatory) options include chillis, peppers, cucumber and aubergines.

The other addition to your plot should be some flowers – these are important for attracting beneficial insects and repelling pests. Pollinators will visit for bright blooms such as cosmos, calendula or nasturtium, while marigolds are said to be effective at repelling aphids.

How?
To find out more information on growing your own you don’t have to look far – there is a plethora of books on the subject, along with websites, apps, magazines and podcasts. Charles Dowding is the creator of the ‘no-dig’ movement and a master of grow your own – his books and website are a great place to start. If you’re short of space, try Huw Richard’s book ‘Veg in One Bed’ for a very simple guide to growing as much as possible in a small area. The book ‘Fruit and Vegetables for Scotland’ by Ken Cox and Caroline Beaton is especially useful for identifying the best varieties for Scottish gardeners.

If Instagram is your thing use the hashtag #GYO or #growyourown to find a community of like-minded gardeners and allotment holders who love to share photos and advice. There are also plenty of podcasts covering food growing and related topics – such as The Organic Gardening Podcast or The Dirt, which is produced by Grow Your Own magazine, another excellent source of information and advice – plus each issue comes with free seeds!

If you’re thinking now’s the time to try growing some food – just go for it. You’ve nothing to lose but the price of a packet of seeds – and you might gain a new passion, better health, more time outdoors and some really tasty fruit and veg!

This article appeared in the Weekend supplement of The Courier, 11th April 2020

Time to plan…

It’s winter, but it’s not cold.

Little green shoots are appearing – but they’re too early.

Hellebores are emerging, the witch hazel is blooming and we even have a couple of snowdrops almost fully out in the front garden.  It’s SpringWinter – not cold enough to be properly winter but not light enough to be properly spring.  Also known – on Instagram at least – as #thatwinterspringthing.

The mild weather and green shoots are not unwelcome – in fact they’re a wonderful reminder of what’s to come. I just wonder if we’re being lulled into a false sense of security, only to be shocked back into the depths of winter by a lengthy icy blast…

In any case there’s not much going on in the garden just yet, and I’m glad of the time to plan ahead for the coming season.  The main projects for this year will be:

  • the white border in the front garden – I’m redesigning one side of the front garden as it’s currently looking the most bare and in need of rejuvenation.  I want to drastically increase the planting and hopefully stick to a mainly white theme, as it’s partly in shade and its backdrop is much larger trees and bushes within the wooded area next door.  The plan is for some lush green/white planting which will lift the whole area during spring/summer
  • planting and sorting the area round the chicken coop – this area needs replanting after we switched the smaller chicken run for a much larger, covered run.  The grass needs fixed and there’s plenty of room at the front of the coop for some new hen-friendly plants
  • growing/selling plants from the Secret Garden – this project began last year when I sold the surplus plants I’d grown for my own garden.  I put the extras onto Facebook Marketplace and they were snapped up by quite a few local folk looking to support a small independent nursery.  I got the best buzz from growing healthy plants for others to enjoy so I definitely want to repeat the experience this year!  (The Secret Garden is so-called because it’s the space I have for raised beds and greenhouse behind a rather unobtrusive-looking door at the bottom corner of the garden.)

So the planning and designing is getting into full swing – I’m researching, drawing, reading and checking my seed stocks to get ready for what is likely to be a busy growing season.

This preparation includes testing out a couple of online drawing/design tools alongside the online systems I already use.  I use a range of different tools for different things – Evernote for clipping and saving articles, photos and plant information; Google Drive for plants/seeds spreadsheets and keeping track of budgets; Microsoft OneNote for drawing and saving designs.  I’m also currently trying the Suttons veg planner tool, which will hopefully help me to plan my fruit/veg growing for this year, as well as my cut flower bed.  And I’ve downloaded an app for my laptop called Bamboo Paper which also allows me to draw and create ‘mood board’ style notebooks.

IMG_8925

Designing the front ‘white’ border with OneNote.  It helps if you do this with wine 🙂

I did contemplate starting an actual physical notebook as a garden journal, and using a real-life pen and ink…but for some reason I seem to get on fine with the online methods.  I think in fact I’m more likely to access these electronic records and keep them updated than a diary-style physical notebook, as lovely as it is to hold and treasure a well-thumbed, dog-eared notebook…

Oh and one more goal which I hope to achieve imminently – sitting two more RHS Level 2 exams in February.  I’ve already been hitting the books again to swot up on plant biology and soil nutrition.  Wish me luck!

Happy 2019 – here’s to a great gardening year!

hydrangea jan 2019


Flower & Food Festival

This is one of the highlights of my gardening year – Dundee’s Flower and Food Festival.

I go every year and really enjoy being in the midst of the best of what our area has to offer in terms of plants, produce and food.  There are displays of beautiful plants and flowers, from amateurs, dedicated growers and local businesses.  Not to mention the rows of fruit and veg and the amazing giant leeks, carrots and cabbages.  It feels like an exhibition built on the hours of love and joy which people have put into growing their favourite things.

I have a new-found appreciation for the people who enter these competitions.  You can’t accidentally grow three petal-perfect chrysanthemums or dahlias.  It’s impossible to grow a leek the size of a plank without putting in a great deal of time and effort to make it as large and perfect as it can be.  Maybe someday when I have more experience, and a great deal more time, I’ll consider trying my hand at a competition bloom, but for now I think I’ll continue to enjoy the flowers and veg I grow on my windowsill or on my plate…

Dahlia heaven at the Flower and Food Festival – so many beautiful blooms on display as part of the Scottish Dahlia and Chrysanthemum Society’s annual competition.

I was also very taken with some of the indoor plants on display – especially this frilly variety of coleus and these gorgeous swirly begonias.

The fruit and veg looked so healthy and colourful – you can tell the people who produced them just love growing!  #veggiegoals

Learning lessons…

This summer I have been learning a few lessons.  Not the book-reading kind – I’ve taken a break from horticulture studies as I decided that it would be madness to add this to the summer agenda of school holidays, parenting, working, enjoying the heatwave and almost constant watering.  I plan to resume studies in September (seems like a good ‘new-term’ kind of time to do it) but there have been plenty of other things to learn on a more practical level during the past few weeks:

1. I CAN have a nursery in my back garden.  This is number one because it’s been the most exciting and satisfying lesson of recent weeks.  For quite a while I’ve dreamed of having my own nursery – growing the kind of plants I love to sell to others – and I’ve take a big step forward by simply doing it.  I had quite a large number of surplus perennials and annuals which I had grown for planting in the front garden.  So I started a Facebook page, listed a few plants on FB Marketplace – and people actually wanted to buy them!

img_58871
The Secret Garden is open for busines…

I’ve called this a micro-nursery because it really is tiny – both in size and in stock availability – compared to a proper commercial nursery anyway! It’s very small-scale and I have not made a huge amount of money – perhaps enough to re-invest in some plants and seeds for next year.  But it has been worth it for the experience of producing plants for others, learning how to market them and deal with customers and moving towards my dream of owning a little independent nursery growing wonderful perennials, annuals, herbs and shrubs suitable for Scottish gardens.  In fact, I suddenly realised that not only moving towards it but I’m actually doing my dream – the Secret Garden micro-nursery is my own little corner of the earth for doing just that.  It may be small, and I may not make a living from it just now – or ever – but I’m doing it!  Having dipped my toe in the water this summer, so to speak, I’m excited to see how I can take it forward.  I am already planning ahead for next year: which plants to grow again and which were not successful or less popular; better ways to market the business, how to grow and expand via social media…. I have so many ideas for how to keep going and growing – and I’m so glad I’ve taken the first step.

2. Echinaceas are tricky to grow from seed.

When they do succeed and flower in the garden they are gorgeous and are currently providing a fantastic pop of pink in my front border.  But I have been trying since early spring to grow the intriguing looking variety ‘Double Decker’ and this is the result…

img_59072

Barely an inch of growth for the entire season.  I don’t know if it’s the seed, the soil, the conditions, or my lack of faith.  But those echinaceas are not going to grow into beautiful, flowering plants.  Mainly because I’ve composted them.

3. Don’t grow cucamelons too close together.

This was a difficult lesson to learn, resulting in me recruiting my eldest daughter to help me untangle about 20 young cucamelon seedlings which had started to twine around each other as well as other plants in the greenhouse.   We spent some time separating the cucamelons’ delicate tendrils, trying not to damage them.  Finally we got them all apart, so I potted up the ones I wanted to grow on, supporting them with bamboo canes.  I also potted a few more into a hanging basket, to see if they’ll grow as successfully hanging down.  However I was still left with quite a number of plants which no-one showed any interest in buying (I guess my local customers are not as interested as I am in experimental or exotic fruit/veg!) so I had to compost these too.  Which leads me to the next lesson…

3. Don’t sow too many seeds!

I do this Every.  Single.  Year.  and tell myself I don’t care – I just want loads of plants!

img_59191
Composting healthy cucamelons…argh! 

But inevitably there are Too Many Plants.  So I have to spend more time and effort potting on, watering and resisting throwing them away because I hate getting rid of potential plants.  However they do end up going in the compost as I have no room or they’re not selling or become too poor quality to sell.  If I want to raise more plants to sell I must be more efficient with space, materials and my time. So – I will sow more sensibly next year.  I will sow more sensibly next year.  I will sow more sensibly next year… I will…

4. Don’t dig – and don’t do green manure

I wanted to have a no-dig policy this year…but then I also decided it would be a good idea to sow green manure.  But these two things are not entirely compatible.  Yes, I think it is possible to do both – but I ended up doing neither very well.  The green manure grew well in some beds, but not so well in others, at least giving me an indication of the soil quality in each one.  But in the spring I then had to cut down and either remove or dig in the plants.  I tried to remove the majority of the largest plants, but eventually ended up digging over most of the soil, which still had shoots and roots left in them.  This is, of course, what you are supposed to do with green manure – but didn’t comply with the no-dig theory!  This autumn I will try to mulch the beds and may well cover some over if they are bare.  I don’t tend to grow many winter crops so I think I will mulch, cover and officially begin my no-dig policy next spring.

img_5915
The Secret Garden in early August

5. It’s all about layers

The front garden is looking well – probably deserves its own separate post to update on how it’s developing – but I still see lots of gaps.  I can see bare soil and smaller-than-they-should-be plants.  When I visit other gardens, I notice the fullness of the planting, how each plant blends together and merges to create a whole effect.  I think I am moving towards this, but it’s taking time.  And that’s ok.  I’m learning that I can’t achieve this look in one growing season, unless I empty the bank account at the local garden centre (not an option, according to my husband).  But I appreciate that this year there’s an extra layer that wasn’t there last year.  And next year there will be another and then another, until I’ve got the overflowing herbaceous border that I can see in my mind’s eye!  I’m playing the long game – and that’s good, because I’m really enjoying it.

20170821-DSC_0438
Echinacea purpurea – as it should look – in the front garden

Sow many seeds…so many seedlings

aquilegia seedling

I’ve been on a sowing frenzy.

Although I work part time and theoretically have two days each week to spend in the garden/greenhouse doing lots of lovely gardening…it never usually works out that way.  Family/work/home responsibilities often creep into this time and so I have to grab gardening opportunities with both hands and make the most of it.  This sometimes means that I will sow like mad or get planting even if conditions aren’t perfect or if it’s a bit early or late – because if I wait until just the right time, I may miss it.

Yesterday gave me just the right opportunity for a bit of seed-sowing: some spare time, a sunny day and the need to stay close to home to nurse a poorly hen (latest on her on my Instagram feed @mycorneroftheearth).  Also we’re into another month – February! – and this brings with it a whole new set of seed packets to crack open and sow to get things off to a nice and early start.  I realise this can be a risky move, as seedlings can end up leggy or be exposed to frosty weather if sown very early.  However, where we live (North-east Scotland) it can be fairly cold and even frosty right into April/May and summers are frustratingly short.  So this year I’ve decided to give many of my plants a good head start so that they can flower for as much as possible of that short window of time when summer properly begins and autumn hits us again.

So my greenhouse is already looking pretty busy…

IMG_1255.jpg

This panoramic shot makes it look like the bench is bending under the weight – but we’re not quite at that stage…yet!  We have: sweet peas, calendula, greater knapweed, leeks, wallflowers, more sweet peas, nasturtiums, various cuttings, astrantia (taking a while to germinate!) two varieties of cosmos and shasta daisies.

And outside I’m hardening off the seedlings which were sown in the autumn and have been overwintering in the greenhouse…

This selection includes aquilegia, gypsophila, some geum cuttings, plus hollyhocks and stipa tenuissima.  What you can’t see on the ground under the table and along the fence is all the extra teasels, lavender and various cuttings of shrubs and fruit trees which I grew last autumn too!

What am I going to do with all these plants?  Well, some of them will definitely be planted out in the front garden.  I’m deliberately sowing a lot of herbaceous perennials and hardy annuals according to my planting plans for the front.  However, I know I’ll end up with too many.  Some, I will probably gift to family and friends but if I really end up with a lot of extra plants, I’m seriously considering selling them – I’m just not quite sure how to do that yet.  More on that later, perhaps.

Bearing in mind all this new growing activity, I’m going to need more kit.  I will definitely need more pots.  Thankfully I spied a bargain recently which will help with hardening off all these new seedlings – my local B&Q was selling off hardwood cold frames marked down from £48 to £20, so I snapped up two!  My husband very kindly put them together for me yesterday.

IMG_1248.jpg

So that’s what’s going on in the Secret Garden at the moment.  Lots of sowing and growing already – and I haven’t even started on veg and/or cut flowers for the raised beds yet!  Spring isn’t quite here yet but I’m getting ready for her…